A game engine alone can produce any game, but it can not produce your game
Confucius, probably
The developers of an engine such as Unity can not possibly cater to any one specific game concept or idea. When it comes to making your game, that is on you alone, and my first major realisation of this dawned on me when I started to design levels for Don’t Drop The Ball.
Boxes Are A Drag
All of the levels shown in the previous blog post were designed by painstakingly dragging a limited selection of default shapes into the scene and manually setting up their collision data. These levels are very short because repeating this ritual over and over to create them was wasting my precious time! They’re also not particularly inspiring to look at.

Mmm, boxy.
If only there was a way for me to design my own level editing tools inside of my game engine…
It’s TOOL TIME
Oh wait, there is! Unity provides a whole editor scripting system that enables regular dorks like me to create all manner of custom tools, with windows, buttons, sliders and more!
In my use case, the most important thing is that it enables me to listen for mouse and keyboard inputs, then run some code to add and modify game objects in response to them!
With this in mind, I set out to create a system that would let me draw terrain objects in the scene by left clicking to create points and lines.
Starting Somewhere

Here’s the initial crusty version of this system.
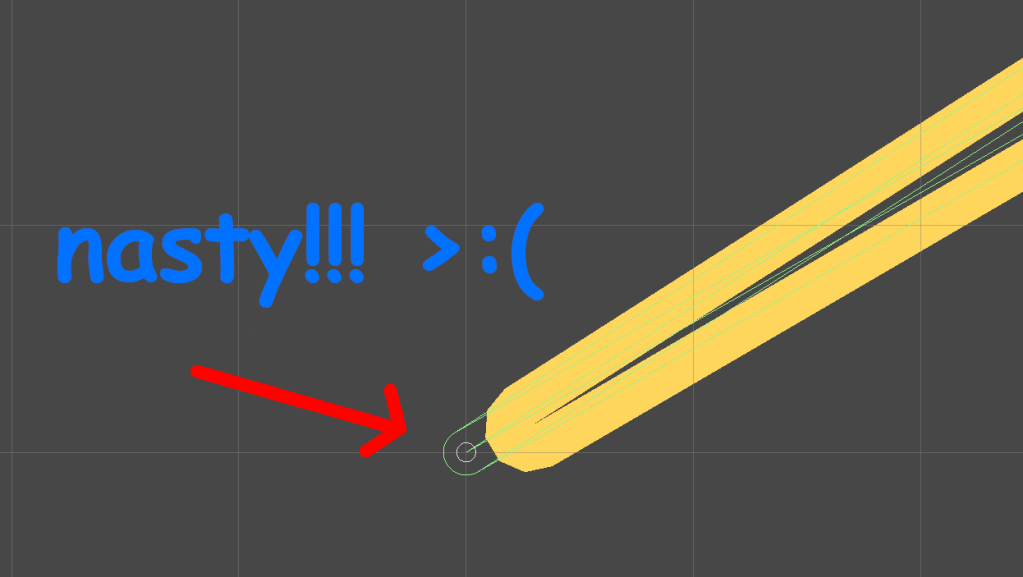
Here, I’m using Unity’s built in Edge Collider and Line Renderer components that both take a list of points in 2D space, then uses those to respectively define some collision boundaries (so the ball doesn’t fall through the floor) and draw a line on the player’s screen (so the player can actually see the floor).
This is a good start, but it turns out that the built in Line Renderer actually super sucks. It doesn’t even attempt to match the boundaries formed by the Edge Collider, which can cause the ball to appear like it is bouncing off of thin air!
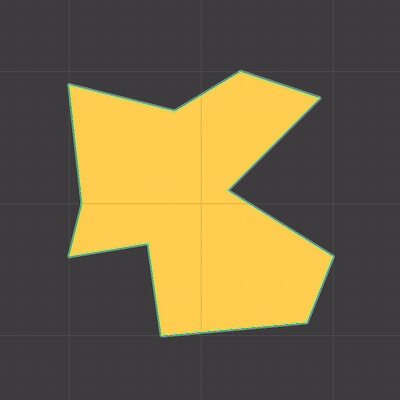
More importantly than this though, I always intended for these terrain objects to be solid shapes, and not hollow in the centre. However, I knew that would be significantly more difficult to get working, so I treated this basic version as a stepping stone.
In game development (and to a degree, in life in general), it is usually sensible to break complicated tasks down into smaller chunks like this so that you don’t get overwhelmed with their overall complexity.
Fill Me In
In basically all games set in a three-dimensional space, solid objects are rendered to the screen by smooshing a bunch of triangles together, and those triangles are usually positioned by an artist in some 3D modelling software beforehand.
This concept can apply to 2D games like Don’t Drop The Ball as well. In this case, I needed some kind of algorithm that would automatically generate those triangles so that they draw a shape that exactly matches the one that I’ve drawn in the editor.
This process is known as polygon triangulation, and there’s one technique (known as ear clipping) which will get the job done provided that you give it the list of drawn vertices in clockwise order, and that none of them are collinear (a.k.a. when more than two vertices form a straight line).
By implementing this algorithm with my existing terrain drawing code, our shapes are now completely solid, and they exactly match the Edge Collider points!

📎 Watch Polygon Triangulation – Overview of Ear Clipping by Two-Bit Coding if you want a really good explanation of this algorithm.
Editing Existing Terrain
At this point, there was one big piece missing with the terrain editing system: there was no editing. Once I’d created a shape, I’d better have liked how it looks, because it was going to stay that way forever. To amend this, I created a default Edit Mode that is constantly running whenever you’re not creating a new floor.
This mode lets me drag around or delete any vertices on any existing terrain shapes, which is convenient for if I don’t quite draw a shape right the first time, and don’t feel like drawing it again from scratch.

However, I also went one step further in this mode by adding a floating cursor that appears whenever the mouse goes near an edge.
If you click and drag this cursor, you add a new vertex between the two vertices that form the line you drag from, which essentially lets you add new edges to existing shapes!
Missing The Point
Drawing shapes with straight edges is all well and good, but I also envisioned being able to create terrain objects with smooth curves as well.
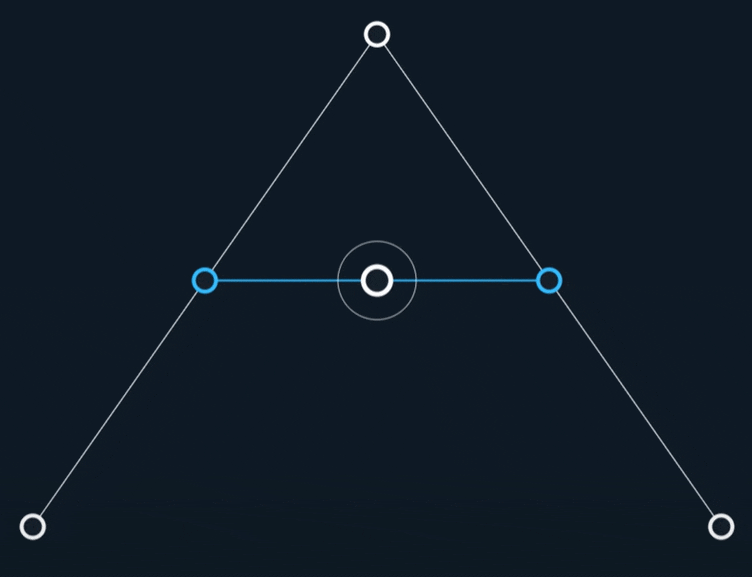
This is where Bézier curves come in. Many game devs will be well acquainted with these, because they are one of the simplest ways to mathematically define a curve, and they have loads of different applications, such as defining a smooth path for a camera to travel along, or using them to detect how far players are along a track in a racing game.
They work by linearly interpolating (or lerping) between two connected lines, then forming a line at the lerp points, and then finally lerping on that line. That final lerp point’s path will form a smooth curve!
Curved Terrain

The simplest way I could think to introduce this Bézier curve into my existing terrain code was to create the concept of vertex types. By default, all points behave as they had before where they form a sharp point.
Now, when I shift + click a point, it toggles it between the default and curved modes. When it’s in the latter mode, the selected vertex and its two surrounding vertices form the “control points” of a Bézier curve!
This still uses the existing ear clipping triangulation code to render the shape; I cut the resulting curve into multiple small straight line segments, which gives the illusion of a smooth curved line.

This opens up a whole bunch of level design possibilities, as I can now create half-pipe/quarter-pipe structures that the ball can slide down, amongst other things.
📎 The Continuity of Splines by Freya Holmér was an invaluable resource for all of this work, and is a super interesting watch regardless.
Conclusion (What Else Is There To Do?)
I am very happy with where I’ve got to with this current terrain editing tool, but there are a whole bunch of things left to add to it, such as…
- The ability to change the type of terrain for each shape. I have made bounce pad/deadly terrain objects that you will have seen in some of the gameplay from the previous post, but I currently still have to drag them in as individual boxes, which is gross!
- The ability to slice existing shapes into multiple parts and carve out spaces inside of shapes. This would be great for creating enclosed rooms for the ball to travel through.
- A whole bunch of code to stop myself from doing dumb stuff, like dragging multiple vertices on top of each other or creating shapes that can’t be triangulated!
- In the long term, I also have to make them look more interesting than solid yellow blocks!
Once I have done these bits, I will finally be ready to sit down and design some actual fun levels, and not just random blobs.
P.S: Words do not make for fun levels.